Perform the following steps to set up Eclipse for handling your exported Java file and create a GUI:
|
2
|
|
3
|
Go to the Libraries tab and click Add External JARs. Add all the JAR files placed in the plugins directory under the COMSOL Multiphysics installation directory (typically C:\Program Files\COMSOL\COMSOL52a\Multiphysics\plugins). This allows Eclipse to find the definitions of the classes used by the COMSOL API and to run the code. In addition add the external Jar file miglayout-4.0-swing.jar (the numbers can be different for the file you downloaded). Click Finish.
|
|
4
|
Drag and drop your exported Java file to the src folder of your Eclipse project. Choose Copy files when Eclipse asks you and click OK.
|
|
7
|
Remove this line that says model.sol("sol1").runAll(); The model does not require solving when setting it up.
|
|
8
|
In order to be able to extract numerical results from the model add some Global nodes to the model. The Global nodes are only available in the COMSOL API and thus cannot be added using the COMSOL Desktop. Add the following lines to the bottom of the run() method; just above the return statement.
|
The file BeamModel.java now contains all the necessary settings to set up a model. This file is not changed again.
Add the main() method of the program that opens the graphics window (frame) and shows the model.
|
1
|
Select New Java Class. Name the new class BeamModelDemo. Select that this class should have a public static void main(String[] args) method. Click Finish.
|
|
2
|
Add a Model field to the BeamModelDemo class by adding these lines to the top of the class
|
Eclipse might complain that JFrame and Model are unknown at this time, and you have to add import statements in order to resolve the names. For the Model variable it is the com.comsol.model package that you should import. Eclipse is helpful and can provide such import statements automatically if you point to the offending new class name and press Ctrl+1. Throughout this demonstration example, add new classes for which such import statements have to be added.
|
4
|
Create an init method in BeamModelDemo. It should only contain a single line, and the method should look like this:
|
|
6
|
Right-click the BeamModelDemo.java file in the Package Explorer and select Run as>Run configuration.
|
|
7
|
|
8
|
Select the Environment tab. Click the New button. Use the Name PATH (on Windows), LD_LIBRARY_PATH (on Linux), or DYLD_LIBRARY_PATH (on Mac) and enter the following text in Value: <comsolinstalldir>/lib/<platformname> where <comsolinstalladir> is the directory where COMSOL Multiphysics is installed and <platformname> is one of win64/glnxa64/maci64 depending on your platform. Click Apply.
|
|
9
|
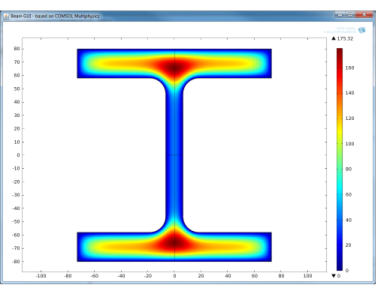
Click Run. The application window opens and a COMSOL graphics panel displays. After several seconds, the model is solved and the 2D graphics with the result are presented.
 |