Graphical User Interfaces > Example Graphical User Interface > Other Details

Other Details
The application by now is able to accept input from the user, simulate a model, and display results graphically as well as numerical results.
In order to finalize the model, add some additional features to the application. At the end, there is a short description of things that remains to be done.
Adding a Menu
A menu is usually added.
1
Add implements ActionListener to the definition of the BeamModelDemo class such that the first line of the class definition reads
public class BeamModelDemo implements ActionListener {
2
public void actionPerformed(ActionEvent e) {
  String ac = e.getActionCommand();
  if (ac.equals("exit")) {
    System.exit(0);
  }
  else if (ac.equals("about")) {
    JOptionPane.showMessageDialog(frame,
    "Beam GUI Example\n"+
    "Simple DEMO example\n"+
    "Copyright 2011-2013",
    "About",
    JOptionPane.DEFAULT_OPTION);
  }
}
3
Add a method that defines the menu and menu items. The code adds a File and a Help menu where the exit and about actions are placed as menu items.
private JMenuBar menu() {
  JMenuBar menubar = new JMenuBar();
 
  JMenu menu = new JMenu("File");
  menubar.add(menu);
 
  JMenuItem item = new JMenuItem("Exit");
  item.setActionCommand("exit");
  item.addActionListener(this);
  menu.add(item);
 
  menu = new JMenu("Help");
  menubar.add(menu);
 
  item = new JMenuItem("About");
  item.setActionCommand("about");
  item.addActionListener(this);
  menu.add(item);
 
  return menubar;
}
4
JMenuBar menubar = menu();
frame.setJMenuBar(menubar);
5
Adding an Icon and an Image
An application that has to be used by other people should have appealing appearance and graphics and a suitable icon. For this application add the COMSOL logo to the window. Choose any icon you want to use for your own application.
1
Add a setIcon method to the BeamModelDemo class
private void setIcon(String filename) {
  BufferedImage img;
  img = null;
  try {
    img = ImageIO.read(new File(filename));
  } catch (IOException e) {
    return;
  }
  frame.setIconImage(img);
}
2
setIcon("comsolicon.png");
3
Place the icon file comsolicon.png in your workspace directory for this project. Right-click BeamModelDemo.java in the Package Explorer and choose Properties in order to determine the location of this directory.
4
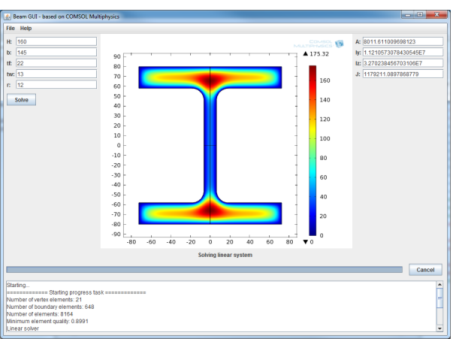
It is convenient to have an image that describes the parameters used in the panel on the left side of the window. Start by adding the ImageComponent.java file to the project by dragging it to the src folder in the Package Explorer.
5
Add these lines to the leftPanel method just before the line with return panel;
ImageComponent img =
  new ImageComponent("beam_dim_small.png");
panel.add(img, "span");
6
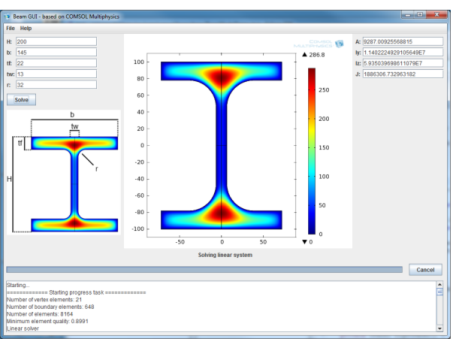
Place the beam_dim_small.png file in the workspace directory for this project.
7
Look and Feel
The appearance of a Java® Swing application by default does not look like other applications that are written specifically for the platform you are running on. You can improve the appearance by setting the Look and Feel for the Java application:
1
Add a lookandfeel method to the BeamModelDemo class:
private void lookandfeel() {
 try {
  UIManager.setLookAndFeel(
   UIManager.getSystemLookAndFeelClassName());
  }
  catch (Exception e) {
  }
}
2
Add a call to lookandfeel at the very top of the start method
lookandfeel();
3
Finishing Notes
The demonstration example is not an application that is ready to be sent to customers. For further development of the application, consider adding the following functionality: